Hidden 9 yrs ago 9 yrs ago Post by PopeAlessandros
Raw
GM
Avatar of PopeAlessandros

PopeAlessandros

Member Seen 2 yrs ago

I'ma put some stuff here. Important links and stuffs.

~~~~~~~~~~~~~~~~~~~~~~~~~~~~~~~~~~~~~~~~~

Character Sheets -
docs.google.com/spreadsheets/d/1mStpP_..

Game Bro Guide -
cityofif.com/forum/viewtopic.php?t=7414

Animations for certain actions:

How View Control Works -
mspaintadventures.com/?s=6&p=002040
How the Select cursor works -
mspaintadventures.com/?s=6&p=002039
How the Revise Cursor works -
mspaintadventures.com/?s=6&p=002048
mspaintadventures.com/?s=6&p=002049
mspaintadventures.com/?s=6&p=002411
mspaintadventures.com/?s=6&p=002413
How the Deploy Cursor works -
mspaintadventures.com/?s=6&p=002051
Opening the Cruxtruder -
mspaintadventures.com/?s=6&p=002076
mspaintadventures.com/?s=6&p=002077
How Totems are Made -
cityofif.com/forum/album_pic.php?pic_i..
The Alchemiter in action -
mspaintadventures.com/?s=6&p=002092
mspaintadventures.com/?s=6&p=002093
Storing items in the HER -
mspaintadventures.com/?s=6&p=002144

What happens when one pulls a fixture out of the floor -
mspaintadventures.com/?s=6&p=002063

Putting a card in the Lathe -
cdn.mspaintadventures.com/storyfiles/h..

Hidden 9 yrs ago 9 yrs ago Post by PopeAlessandros
Raw
GM
Avatar of PopeAlessandros

PopeAlessandros

Member Seen 2 yrs ago


Welcome to your Game Bro Guide to SBURB! I'm Sandro, and in the following paragraphs I will be introducing you to the world of SBURB. What does SBURB stand for you ask? I can't tell you, for I myself have no idea! I do however have a full understanding of the systems and tools of game play, so that's what we'll be talking about today.

Installation & Set-up

If you are holding this guide then you have purchased the full package game set for SBURB. There are two discs that come with the package, disc 1 and disc 2. You need both discs in order to play the game properly. Disc one allows you to be a Player in the game, download this one first. The second disc allows you to be a Host and should be downloaded second. While the game can be played alone, it is highly discouraged. Once you have gathered your Players one must create a circular chain of sorts. Each player would become Host of the next Player until you reach the last Player, who will then become Host to the first Player. To become a Host of your target Player simply contact them via your “Host” function found on disk 2 while they are running their Player disc. After linking as Host to another player, simply switch back to your own Player disc if you still need someone to link to you as your Host. Once the chain is complete the discs will vanish into the astral plain and will never be seen again.

Controls

So, now I guess I should explain this “Host” and “Player” business huh? Alright, this is how it breaks down. I'll start with the Player.

Player - What Players can do

Chapalog Deck - Item Storage

When you first start the game a stack of twelve cards that look like this will pop up in front of you.


This set of cards is known as your Chapalog deck. Now you just grab up that stack 'cause those are your item slots. Those suckers will vanish, only to appear before your eyes in a row whenever you want them to. To put something on a card, simply touch the item with your hand and enter the command “Chapalog” in your mind. The item will then be placed inside a card. Most items can be carried this way, including but not limited to stuff the size of a car, however each character is limited to the size and weight their level allows. The higher the level, the larger things you can Chapalog. To retrieve the items on the cards pull down the cards before you, reach out, and take it. The item will appear in your hand. Unless of course it's a car. That size stuff appears directly on the ground. That's all there really is for your Chapalog deck, now on to your Strife deck.

Strife Deck - Your Weapon System

Strife is the word we use for fighting in this game. Your strife deck is designed to help you out with your Strife weapons. Each deck has 5 blank cards that can be filled with a weapon. They look like this:

Here's the catch, each card can only be converted one into a particular type of Strife card. So let's say you pick a Hammer as your main weapon. That card can now only hold hammers and will be labeled Hammerkind, and can never be reconfigured to hold a different type of weapon. Not only that, but unlike your Chapalog deck, each card can hold up to 4 items. So the Hammer card would be able to hold 4 hammers. So think hard before filling up those Strife deck cards. But enough about hammers! Your weapon types must be picked from household items on the approved list bellow. Keep in mind that just because they start out as mundane everyday items, doesn't mean they have to stay that way. Why, I remember a girl who turned knitting needles into the most powerful and evil pair of needles one could ever imagine! They could cast the darkest magic spells and. . . . Anyway, back on topic.

Weapons - The everyday items that can be used as weapons in game

Pizza Cutter
Bat
Rolling Pin
Plunger
Yo-yo
Scissors
Pepper Spray
Chainsaw
Crowbar
Broom
Poker
Icepick
Golf Club
Hammer
Rope
Shovel
Spoon
Fist
Statue
Spatula
Screwdriver
Blade
Pistol
Lamp
Stun Gun
Ball
Rake
Plank
Glove
Fork
Cane
Curling Iron
Chain
Knife
Table Leg
Shotgun
Needle
Dumbbell
Hackeysack
Vacuum
Mop
Trophy
Ladle
Cord
Iron
Saw
Cleaver
Ice Skate
Wrench
Umbrella
Hose
Book
Bust
Spade
Pipe
Nail
Hairdryer
Throwing Star
Tongs
Razor
Fire Extinguisher
Branch
Bowling Pin
Bomb
Woodwind
Stapler
Rifle
Candle Stick
Paddle
Bow
Barbed Wire
Dart
Marble
Pliers
Fireworks
Chisel
Aerosol
Shoe
Puppet
Fan
Brass
Rock
Scythe

Final notes on Weapons

Totally rad right? So many to choose from! Pick wisely. Oh, and final notes on your Strife deck. Whichever weapon card you have on the top of your deck allows for instantanious weapon call of that type of weapon. The weapons on the lower cards will take more time to appear when you call them. The deck is entirely inside you head, so you have to visualize shuffling the deck before combat to get the card on top that you want at the ready. Also, you can wield two of the SAME kind of weapon at once, but never two different kinds at the same time. And that's about it, now on to the Hostly duties.

Host - What Hosts can do

Each Player is also a Host to another player. As Host you will have several duties to your player that will be carried out using the controls below. As Host you will be able to see your Player at any time with your computer when you have the SBURB client up. You don't need it up all the time, and seeing as you'll have your own “playing” to do it's wise to not spend all one's time in Host mode. When viewing your Player in Host mode, a series of controls will appear at the top of your screen, like so –


View Control - How you view your player

Starting from the left you can see there is a directional control panel. This panel allows the host to move around in their Player's environment. Up, down, left, right, rotate left, rotate right, bird's eye view, looking from underneath(Hey, keep your mind out of the gutter), as well as a handy zoom-in zoom-out control. Also in this little green area is a save button and open file button. . . . .Which do absolutely nothing. Some fine decorations though ain't they? The [x] button makes the control panel slide up and vanish into the top of your screen leaving behind a little button for you to pull it back down with.

Buttons - The other Host tools

Select button - Cursor for moving objects

Next, the 7 buttons. Well, the fist button, the one far left of the 7, is the 'Select' button. This allows you to pick up and move thing's around your Player's house such as furniture and fixtures. Be warned, this isn't like SIMs where moving the toilet seems to move the very sewer system with it. You pull up the toilet and it's like ripping it right out of the floor. Complete with hole and gushing water, you'll have a mess on your hands. You also can not select the Player themselves. The Select function has a distance limit and has a range of about 20 feet in diameter around the player. The range is shaped like a cylinder and the range above and below the player is a lot further, at 50 feet above and below.

Revise button - Cursor for Building and Demolishing

The second button, Revise, is one of the most fun buttons in my opinion. This is the one that allows you to make changes to the actual structure of the world around your Player. You can build stairs and ladders, platforms, whole new rooms. It's like the construction function on SIMs, if you've ever played it. We'll get into why this button is so important later on in the guide.

Deploy button - Cursor for purchasing, placing, and storing Host Specific Items

Time for the third button. Host have their own collection of items. These items are necessary for the game, and can only be distributed with the Deploy button. This button is the only way to grab the game items from their place in the Host Equipment Registry, which is the next button in the line.

Host Equipment Registry - Opens the Host Equipment market and Host Item Storage area

The Host Equipment Registry (Or HER for short) stores the equipment needed to prepare your Player for their game. At first, only four items are accessible. These are the Cruxtruder, Totem Lathe, Alchemiter, and a Pre-Punched card. More on these items later. The Host can also pick up certain items and store them under this button. The storeable items are limited to items made with the Alchemiter.

The other buttons

The last three buttons are Grist Cache, Explore Atheneum, and Alchemy Excursus which will all be explained at a later time.

Well, now that we know all the controls, let's get this game underway!

Getting Started

Okay, now that you're all downloaded and can freely mess with eachother's environments, the game has begun, right? Wrong! Consider yourselves in the entryway, you all still need to enter the game proper. In order to do that, you'll need to learn a bit about all those neat little gadgets the game provides you with from the beginning. The first four items are free, but after that, the equipment will require Grist for deployment. But, as for the first 4:

Starter Host Equipment - What it is and what can it do


Cruxtruder: The Cruxtruder has 4 funtions;
(1) Release Kernel Sprite (To be explained later)
(2) Produce Cruxite Dowels (Te be explined later)
(3) Start a timer leading to ???
(4) Function to be revealed later.
After the Host deploys this item, it must be turned on before use. This bit of equipment requires a hard blow to the pipe looking piece on top to turn on. The Host can provide this blow by picking up a heavy object and bouncing it of the top, or if the Player has something handy of sufficient weight, they can do it themselves. Once struck, four things will happen. First, the top will pop off. Second, a ball of light like this will pop out.

But will be in your character specific color.
Third, a Cruxite Dowel will be created in your character specific color. They look like this:

And lastly, the timer on the side will be activated, and will start counting down. Now, what does all this mean? I'll get to it later. For now just know that after activation, the Cruxtruder is your source of Cruxite Dowels.


Pre-Punched Card: Punched card are the blueprints for creating items in the game. Before entering the game, the only punched card you will have access to it this Pre-Punched card. This card is the only one of it's kind and all other punched cards will have to be created by the player themself. The Pre-Punched card has a picture of an item on it. This item is what you'll need to enter the game. For example, in a previous session, a Player named John's card had an apple on it. So an apple was created. In order for John to enter his session, he had to take a bite of the apple. Another Player in the same session, Rose, had to crack open a bottle. Each Player's item is unique, but over all the item will need to be damaged or broken to enter the game. In order to make your own Item, start by putting the card in the Totem Lathe.


Totem Lathe: This equipment is for shaping your Cruxite Dowels into blueprints for creating items. These blueprints are called Totems. Simply clamp the dowel in place and insert a Punched Card into the appropriate slot and the Lathe will go to work. You'll be able to make your own Punched Cards in the future but for now your only option is the Pre-Punched card. If more than one card is inserted the Lathe will mix the two or more objects together to create interesting results. Just for an example, a pogo ride mixed with a hammer mixed with a iron could make something like this:

Hammerkind: Wrinklefucker

But, we'll talk more about the hole punching experiments later. Now, on to what to do with Totems once carved!


Alchemiter: This bit of equipment is what reads the totems and creates the item the totem represents. Once you have your Totem, place it on the little platform attached to the big platform next to the giant mechanical arm. Once you do, the arm will come around, read the totem, and *POOF* the item the totem represents will appear on the large platform! Each item made will have required materials required to create it. These materials are dropped by the monsters you defeat in the game and will be explained more fully in a later update.

The Kernel Sprite - Your in game guide and possible battle aid

Remember that ball of light that was released when you opening the Cruxtruder? That is a Kernel Sprite. Sprites are your main source of information when playing the game. At first they are just annoying balls of light, but after being Proto-typed twice, it will be one of your most valuable assets.

Sprite Proto-typing - A how to guide

In order to Proto-type your Sprite you have to put something into it. There is no real limit to what you can use to Proto-type your sprite, but there are some guidelines and facts you should keep in mind. What you use to Proto-type your Sprite the first time will determine what the monsters in your session will look like as well as their power level. If you do not Proto-type your Sprite at least once before entering the game, your enemies will be too powerful to defeat and there will be no way to win your session. The second Proto-typeing can happen any time before or after entering, it doesn't matter. Here is an example of a Sprite that has been Proto-typed once:

Object used: Damaged One Armed Harlequin Doll

Also, keep in mind that, as your source of information, it would be best if the Sprite can vocalize when you're done Proto-typeing it. So, if you want your Sprite to be able to give you the information you want, it must be Proto-typed with at least one living or once living creature that can vocalize. This is everything from a dead rabbit to a living person. Only one session has ever been recorded where a living human was used, and despite the fact that the Sprite turned out very well and no one really died in the making(It's a time thing, don't ask), it is highly discouraged to use a living person. Ashes of the dead are useable. Only one thing used to Proto-type need the ability to vocalize to make a talking Sprite, so any inanimate object can e used for the other Proto-typeing. Here is an example Sprite:

Objects used: Dead Cat and Squid Princess Doll

The last thing to keep in mind about Sprites is they can help you in several ways. True, they are your main source of information, but they can also fight along side you and as in the case of Nannasprite, they can perform such mundane tasks as baking cookies.

Other then that, have fun, and be creative!

Final Note - A dire warning

The final note I have is about the Timer on the Cruxtruder. If that sucker reaches zero before you enter the game, it's Game Over. See, it's counting down to the time when the place you're standing gets hit by a meteor. I'll tell you more about it in the next issue. Since you bought the game, each new issue of Game Bros will be sent to you via E-mail as you progress through the game. Later suckers!

- Sandro
Hidden 9 yrs ago 9 yrs ago Post by PopeAlessandros
Raw
GM
Avatar of PopeAlessandros

PopeAlessandros

Member Seen 2 yrs ago


Let me be the first to congratulate you for avoiding complete annihilation at the hands of a giant meteorite! *Applauds* If you are reading this, you have successfully entered the game, and the place you were standing is now a large crater. All you knew and loved are gone. . . .But enough of that, on with the game!

Your Starting Place – What changes have been made to the world around you, and what you brought with you into the game

Upon entering the game, your surroundings will have changed dramatically. Each person enters the game at a different place so the area around you will look unique to each individual player, and have it's own name. If you were playing inside a building at the time, the building and some of the area around it will have accompanied you to the game world. If you were sitting in the middle of an open area, then you'll have taken a bit of the area around you with, more specifically the stretch of area beneath you and your Host Equipment. It is highly recommended to be inside or atop a building when entering the game. But now that you're already in, that doesn’t matter now does it?

The name of the place you enter will be displayed before your eyes for a moment right after entering, and can be called up anytime in the future should you forget where you are and need a reminder. This name will describe the aspects of your surroundings. In an prior session, the player named Rose entered the game into “The Land of Light an Rain”. This land has many clouds around pouring rainbow colored rain to the vast ocean below, doted with tiny islands.

Now that you are in the game, you may want to keep an eye out for the Imp level monsters that will start appearing around you.

*The Last Three Buttons – A run down of what the last three buttons in the Host Controls do*


Grist Cache – Where your Alchemy and Building materials are stored

Each player has their own Grist Cache, where the materials dropped by the game's monsters are stored. It looks something like this at the beginning of the game - mspaintadventures.com/?s=6&p=002053

As you can see there aren't many materials initially available to Players at the beginning of the game. As you play more materials will become available, and you will be able to hold more in your Cache. Players are unable to see their own Cache, so their Host is responsible for keeping track of how much Grist their Player has and can hold.
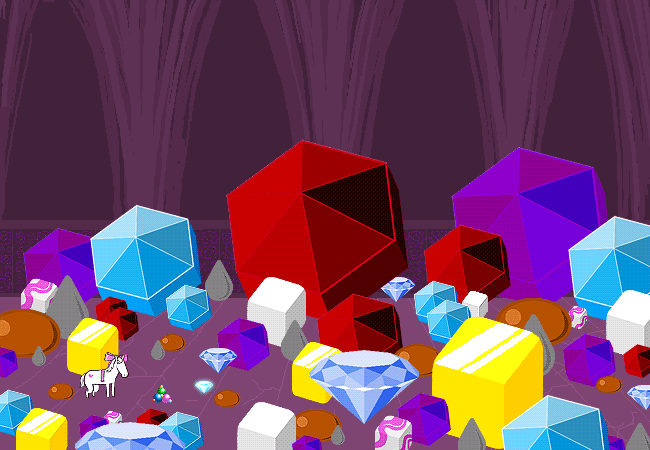


Grist – Alchemy and Building materials

All that stuff above (Minus the pony) is Grist. Grist is the material used in crafting new items with Alchemy and building up your starting structure. As you can see Grist comes in many different shapes colors and sizes. The pale blue gushers are Build Grist, while the diamond shaped jems are, you guessed it, Diamond Grist. This is the stuff needed to build up to the first gate above where a player enters the game, as well as what one needs to make stuff with the Alchemiter. Lower level enemies will drop small portions of low grade Grist like Shale, Sulfur, and Tar, which will allow you to create basic grade weapons and items. Almost all enemies drop Build Grist. Once you defeat an enemy, simply touch each piece of Grist to add it to your Grist Cache.

Explorer Athenem – For recording and storing Totems

Once a Totem is made, it is automaticly registered here in the Explorer Atheneum. Once registered the Totem can be stored in the Atheneum, like so - mspaintadventures.com/?s=6&p=002520

Once stored your host can then hover over any Totem and check what Grist it will take to create. If the item has never been made or Chapaloged before, the picture will remain blank until the item is created. This is a useful way to hold on to your totems, and also lets you check if an item is even creatable before trying to use the Totem on the Alchemiter.

Alchemy Excursus – Records information on your Alchemy Experiments

Alchemy in SBURB is done by combining one or more object together in two different manners. After combining any number of items, the Alchemy Excursus will record what you mixed togetherand in what manner, and what resulted from the mix. This will help you keep track of which were useful mixes, and which were not. Further explention on Alchemy can be found below.

*New Items in your Host Equipment Registry and what you can do with them*


Punch Designix – For punching cards
Cost: 4 Shale Grist


The Punch Designix allows you to make Punched Cards like the Pre-Punched card you used to enter the game. Lemme explain how this works. It may sound complicated, but is actually quite simple once you get the hang of it. Remember your Item cards? These are the cards you will be punching holes in. Don't worry, once you make one card holey, a new blank item card will automatically replace the one you just put holes in. Now, you can punch a card one of two way. First, instead of reaching out to grab an item off a card, instead focus on grabbing the card itself. If there is an item on the card, and you put it in the slot on the Punch Designix, it will automatically punch holes in the card to correspond with the item on said card when you press the green button. Unfortunately, this fuses the item to the card and makes the item unusable. But, do not fret, you didn't lose the item per se, but we'll get to that in a minute.

The other way to punch a card, and how you share items with other players, is by flipping over the card with an item on it and reading the code on the back. The code on the back of each card with an item on it consists of 8 characters which can be combination of any of the following; a-z, A-Z, 0-9 and ! and ?. (Example code – Ji8yTe5?) like this - mspaintadventures.com/?s=6&p=002423 Once you have the code, insert a blank card into the slot on the Punch Designix, enter the code using the keyboard, and press the green button. Either way you do it, you end up with a punched card. In order to share an item simply send the code for an item to another person with access to a Punch Designix.

Note - You can also punch in random codes and punch cards, but the results 99 times out of 100 are useless mixed up items. Also, to make weapons, you can not punch your Strife Deck cards, but you can get the codes off the back of the card of each individual weapon, retrieved in the same way as the item cards.


Grist Torrent CD – Allows sharing of Grist
Cost: 100 Build Grist

Grist Torrent: This client allows for Grist to be shared between all the players. Only one person needs to have downloaded it for it to work for the entire group. It also stores Grist if there is an overflow and passes it out as the players use up their stores. Simply have one player download it and activate the torrent. Once this is done all Grist can be shared beween players as long as the Player has access to the type of Grist they are trying to leech from another player.

Alchemiter Upgrades:


Punch Card Shunt – Part one of Upgrading your Alchemiter
Cost: 10 Build Grist

This item, in combination with a punched card and the Jumper Block Extension allows for the upgrading of your Alchemiter. Simply place a punched card of the item you would like to use to upgrade your Alchemiter into the slot on the Punch Card Shunt, then place the shunt on one of the blocks 8 on the Jumper Block Extension. Some items used to upgrade the Alchemiter will prove useful, while most items will render the Alchemiter useless. If you render the Alchemiter useless, do not worry, simply remove the card from the Punch Card Shunt and the upgrade will disappear.


Jumper Block Extension – Part two of Upgrading your Alchemiter
Cost: 1,000 Build Grist

This item attaches directly to the side of the Alchemiter and, in conjunction with punched cards and Punch Card Shunts, allows you to upgrade your Alchemiter. To do this, insert a punched card into a Punch Card Shunt, and place it on one of the 8 blocks on the Jumper Block Extension. Whatever item is on the card will make changes to the Alchemiter, some useful, and some that make the Alchemiter useless. Do not fret, if a card makes the Alchemiter useless, just remove it and the upgrade will vanish.

Useful Upgrades
The following Host Equipments and other items have proven useful upgrades to the Alchemiter, making the process of Alchemizing much faster, easier, and opens up new possibilities:

Cruxtruder – Attaches the Cruxtruder to the Alchemiter so you don't have to move between machines to retrive your Cruxite Dowels

Totem Lathe – Attaches the Totem Lathe directly to the Alchemiter so you don't have to move between machines to get your Totem carving done

Holopad – Allows for viewing items before Alchemizing. When combined with the Totem Lathe and Cruxtruder upgrades, eliminates the need for carving Totems

Punch Designix – Attaches the Punch Designix directly to the Alchemiter so you don't have to move between machines to get your card punching done

Enlarger/Microscope - Allows you to change the size of the item before Alchemizing it. The larger you make it, the more expensive, and vice versa

Jumper Block Extension - By using a punched card that is punched to represent the Jumper Block Extension, you can eliminate the need for the Shunts and make the Alchemiter more streamlined


Holopad – Holograph Displaying Platform
Cost: 10,000 Build Grist

The Holopad allows the Player to view an item they want to make on the Alchemiter before actually making it. The Holopad must be attached as an upgrade to an Alchemiter in order to function. How to attach it as an upgrade is explained below. Once attached to an Alchemiter, one can slip a punched card(or more than one if performing Alchemy)into the Holopad's card slot and it will display a hologram of what the card or cards will create. This allows for the Player not just the Host to see what any combination of cards will make before Mixing, allowing the Player a chance to shift the cards around and change the Alchemy type between && and || to see which suits their purposes better.

Note: If the Alchemiter also has the Totem Lathe Upgrade and the Cruxtruder Upgrade, instead of showing the item, it will show a scanable representation of the Totem needed to make the item. To look at the item, simply remove the Totem Lathe punched card. Once the item looks to your liking, just slide the Totem Lathe card back in and the Holototem can be scanned ant the item Alchemized.

(Note: There are not the only useful upgrades that can be made, these are simply the ones that have been proven useful this far. An Alchemiter with all above upgrades will look like this - mspaintadventures.com/?s=6&p=003474 )

*Additional Information – Things you need to know*
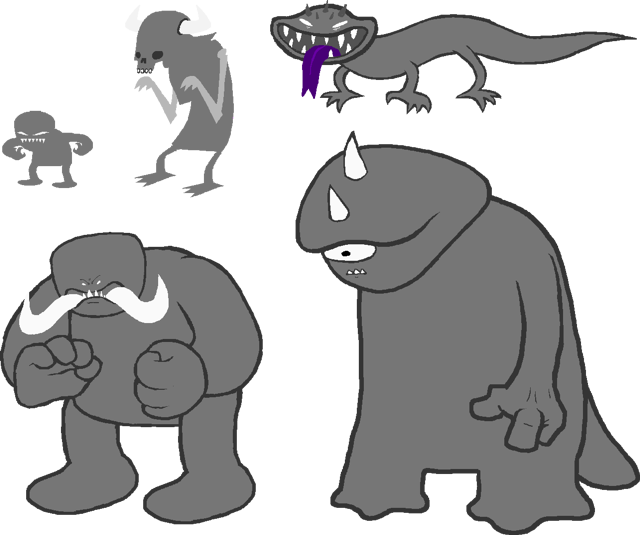


Monsters: Above are the empty templates for the different level monsters before your input adds to/changes their forms. Top left is the Imp class, which is the weakest and the one you'll see the most of at this point. A few Ogre may show up(Bottom left) but don't worry, the game keeps track of your power level and won't send anything at you that you can't handle. . . . .Yet. Monsters around the area where you enter can either be killed by you as the Player, or your Host. (Note: The host can kill monsters by either dropping heavy objects on them or throwing heavy objects at them. Player will not receive Exp, but Host help is useful in a pinch) Like so - mspaintadventures.com/?s=6&p=002377
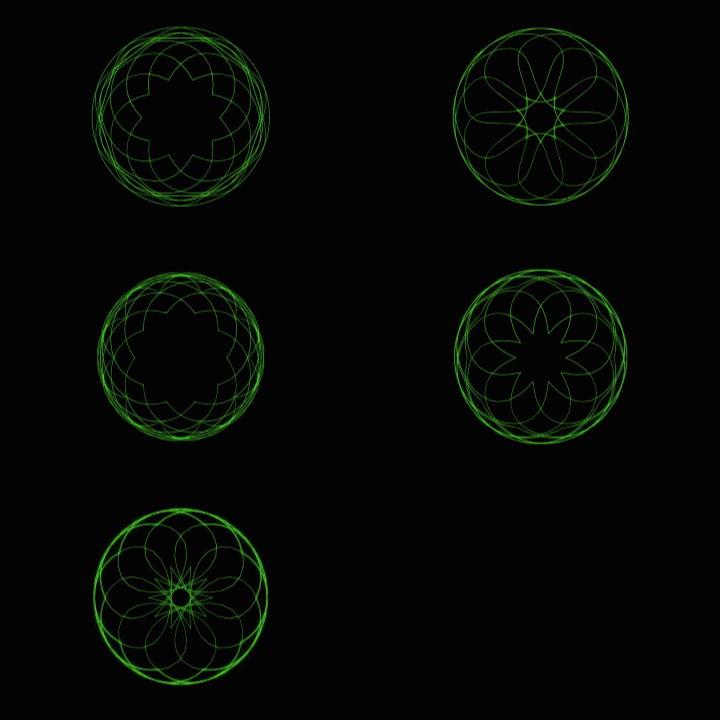


Gates: Above is an example of a Gate. What is a gate? Gates are how you advance to the next stage in your game. Once you enter the game, your Sprite will go through a transformation, splitting into three parts. A black shadow figure of your Sprite will break off and head in one direction, while a white shadow figure of your Sprite will break off and head strait up from where you entered the game like so - mspaintadventures.com/?s=6&p=002151 As it flies up it will leave a line of shifting spyrographs in it's wake like the one above, but in your character's given color. It is the Host's job to build up to the gate using Build Grist and the Revise button. The Host can make stairs, ladders, platforms, rooms, and rooftops as well as doors and archways. And before you get it in your head that all you have to do is make a bunch of stairs right up to the gate, please note that your building must be structurally sound. No stairs leading up without supports, and no floating platforms.

How the Revise Cursor works - mspaintadventures.com/?s=6&p=002048
mspaintadventures.com/?s=6&p=002049
mspaintadventures.com/?s=6&p=002411
mspaintadventures.com/?s=6&p=002413

An example of a properly built gate climbing structure - mspaintadventures.com/?s=6&p=004581

*Alchemy – The game's system for making and upgrading items*

By placing two or more punched cards in the Totem Lathe slot at once you can effectively combine the items together to make a whole new item. Like this:
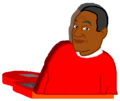

Cosbytop: Items used – Laptop and picture of Bill Cosby

Combining items wisely – how to combine items to make more useful items

As you saw before with the Wrinklefucker, you can also make weapons. So too, can you make outfits and armor. Anything will mix with anything, and it's usefulness depends on both the compatibility of the two items, and the original usefulness of the item to begin with. So say mix a sponge with a mushroom, you get a sponroom which leaves a trail of fungus behind as you scrub with it. May be useful, but most likely not. Mix an iPhone with sunglasses makes iShades which makes for a handy hands free communications device. (Note: It is suggested to make several computer devices of varying kinds so you don't have to worry about losing your access to the other players.) Mixing a cord with a razor will make a Razor Whip, a whip with razor sharp edges and a handle. That one's self explanatory I hope.

Alchemy Types – The two different ways to combine items

When mixing, there are two way to go about it: The && mix and the || mix.

The && Mix - Blending

The && mix perfectly combines two items so that the result is an even mixture of both items. Take the iShades for example - mspaintadventures.com/storyfiles/hs2/0.. It takes every function of the iPhone and mixes it with the shades with the display screen becoming the lenses, and the mouth and ear pieces forming on the sides of the frame. The two items, blended.

The || Mix - Fusion

The || mix instead of blending items, fuses them together. This one is easier to show then tell.

See how the second item rather than blending, it attached to the first item, only making minor aesthetic changes to the weapon handle? This is || mixing. It's useful when you don't want to make a completely new item, but rather, enhance an item while the item keeps it's shape and function.

Over all, the Alchemy in this game has no limits save for what one can afford with your Grist, so have fun, be creative, and don't feel discouraged if somethings turns out crappy.

Your First Goal – A quick rundown of the first section of the game

Now, this part of the game can be explained quite simply. The Players need to gather Grist by killing the monsters now overrunning the area. In turn the Host need to use the gathered Build Grist to build up to the first of several gates that have appeared above the area where their Player entered the game. Once through the gate, the next adventure starts and you'll get the next Game Bro Update. Easy enough, right?

Changes – A myterious happening

The final note I have in this Update is about your personal change you undergo upon entering. I won't go into detail, but once you enter the game, you yourself will gain a power of a specific aspect. Can't tell you much about it here, but know that this power can become your greatest advantage in the game. Each power has a Aspect and Class, and can be utilized through items you create. That's all about that I can say right now, other then this title is defined by who you are. Alright dude, smell ya later!

- Sandro
↑ Top
© 2007-2024
BBCode Cheatsheet